Tuesday, December 10, 2013

Students begin to use common sense on the job site

JDHS house build 12/2-12/6
Story By: Samuel Bibb
Documentation by: Michael Anderson


There’s nothing like the holiday season in Juneau, Alaska. It just seems to bring the best out of everybody, including the JDHS house build class. With spirits running high, students begin to pick up the pace a bit and start to use common sense more on the job site. The term “use common sense” has been an ongoing motto, and a laughing matter for the team. Mr. Bullick has been the main catalyst for the job site slang talk.
Work on the site can be a laughing matter some of the time, but work is work and things need to be done. Through the first week of december advancements on the house were made every day, including the installment of the 2nd floor interior walls. The team spent a majority of the week working on the framing project. At first the students thought the process was going to be a simple one, But they thought wrong. Constructing and placing a wall is a taller task than advertized. It’s not just a job that you can do without learning background information about it before doing it.
Although encountering problems through the process, students like Derik Vance overcame struggles at first. Derik couldn’t get a stubborn nail into a simple stud for the longest time. He eventually used his problem solving skills to think out his problem and solve it. The Teaching staff has been reminding students everyday to think out there problem before asking a teacher. The advisors have also been telling the students all sorts of tips and tricks that will help the students in the construction field down the road.  


Wednesday, December 4, 2013

Students adjust to bone chilling temperatures

JDHS house build 11/18-11/29
Story by: Samuel Bibb
Documentation by: Drecar Del Castillo
With the dark days of winter starting to seep in, The weather seems to affect everything that you do. While working outside in the cold, keeping warm is key. The JDHS house build class encountered many problems through their first week of winter. One of those problems being; trying to stay warm the entire class period. A simple cotton sweater and jeans won’t do the trick, you need more than that.
With the base of the roof being installed work inside of the house may be used as a way to escape from the elements. With monday the 18th of November being one of the first days of sub- freezing temperatures. Adjustments had to be made all around. A lot of the students weren't dressed for the weather which impacted their performance on the job site.
A majority of the students worked on the ground level putting up Tyvek on the perimeter of the house. Tyvek is used to provide a water barrier between the outer cladding of a structure and the frame. The rest of the students finished up jobs that to needed to be done. Later in the week After finishing up the tyvek process, the students headed back to the classroom to work on much needed math skills. Arithmetic is a very important concept when it comes to construction. PCL’s construction manager Trever Gallagher supported that idea by saying “You don’t just have to know how to pound a nail into a board to be successful in construction, you have to be well rounded and very intelligent.” Gallagher visited the class tuesday the 26th to inform the students on the future after high school. Alot of the students including myself we’re inspired by what Trever said to us.
Wednesday was a transition day for the class, the scene changed from the classroom back to the jobsite. There was also a sense of transition on the jobsite. The class switched from working outside to working inside. The next major job to complete for the house build team was to complete framing and construct the 2nd floor interior wall framing. The class started that process on Wednesday.


Thursday, November 7, 2013

Second floor wall framing and roof joist installation.

We're working rain or shine, getting the second floor walls framed and sheathed with plywood. We've also started to install the roof joist but not before learning how to calculate and cut the roof joist properly. The ground crew measures and cuts the joist and the second floor crew does the installation. We're learning the important advantages of working as a team and it is showing onsite. We run tight ship when we're building a house. We take the necessary strides to learn about our building processes and are accomplishing each goal we set for the day. 


Tuesday, October 15, 2013

Preparing Interior Floor Slab for a Concrete Pour

Construction Progress Report:
by Adriana Botelno

This week we prepared to pour the first floor slab. We did some final leveling of the sand and placed electrical conduit in the sandy fill. After that we laid pink insulation and a grid of rebar that was held up in place by small concrete rebar chairs. Mikey and I put in the second support beam and began to cut nailer blocking for cabinets for later on in the house building project when the cabinets are installed. We also talked about how concrete is ordered in cubic yards and practiced using fractions and decimals.


Friday, October 11, 2013

2013/14 JDHS Housebuild Project well underway!

Construction Progress Report:
by Drecar Del Castillo

9/30/13
The class went over how to read the house blueprints

10/1/13
The class set up time lapse stations around the house and took pictures of each worker for their bio.

10/2/13
The class cleaned out the work van and refurbished the JDHS House Build Project sign.

10/4/13
The class attended the open house for the house built by last years student builders.


Friday, August 9, 2013

Coming to an End

With my last day of service as SAGA’s Construction Trainer Assistant comes my last posting as blog author for the Juneau-Douglas High School’s House-Build Program. Being involved with the House-Build program for the better part of 9 months has been a rewarding experience. I was a given a first-hand look at the process of residential construction and had the opportunity to be involved with nearly every step along the way. What’s more, I had the privilege to impart everything I had learned to the 8 high-school students enrolled in the program. The House-Build class is unlike anything I have ever been a part of and it was truly a pleasure to be involved with a program that provides a positive and challenging learning experience for students while improving the community by creating new housing units. Within the next few weeks a new group of students and a new Construction Trainer Assistant will start the new school year by putting up a frame for a new house and I wish them, as well as all others involved with the program, the best of luck.


But let’s not forget that we have our current house still in progress. 5871 Churchill Way is nearly at the completed stage, accept for a short list of minor tasks that are awaiting the right circumstances. Below are pictures of the interior and exterior of the house in its mostly completed stage.

Thanks for reading and your continued support. Stay posted for updates on the upcoming school year’s House-Build project.


Tuesday, July 2, 2013

Putting on the Finish Touches

5871 Churchill Way is nearing the end of its construction phase. Since installing our cabinets and doors, we have added trim on our window sills, door frames, and base trim. In addition, all of our appliances have been delivered and installed. Currently, we are in the midst of our last major project: our bamboo staircase with built-in bookshelves, which you will hear more about on another day. For today's post, we have a quick summary of the installation of our trim and appliances.

A large pile of trim which kept us busy for a few days
For our house's trim we used board lumber manufactured from hemlock that varied in size between long lengths of 1x3 for beneath the window sills to a 14 ft. length of 1x10 for the base trim of our staircase. In addition, we used 1x4 for our door casing, 1x6 for our base trim, and 3/4" red oak plywood for our window sills.

The first section of house that was covered with finished trim were our doors. The trim around our doors is referred to as casing and consisted of two side pieces and a length over the top known as a head casing.

Before trim

After trim

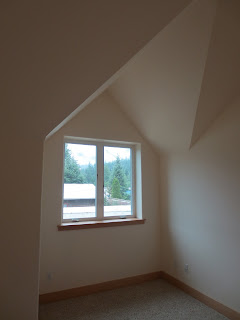
After we had finished casing our interior doors we moved to installing base trim. In the upstairs of our house, the base trim was set a half inch off the ground to leave room for carpet and downstairs was set right on top of the bamboo flooring.

Base trim in the master bedroom
Door casing and base trim in the guest bedroom
Guest bedroom door after door casing was installed. In the background, base trim is being installed.


Being a smaller house, the base trim and door casing took little over a day's work of work and once they were finished we moved over to finishing the windows with trim. For this, we cut out lengths of  3/4" plywood with a red oak face and back veneer to fit in the deep window sills. Once the plywood pieces were in place, we added a piece of 1x3 hemlock on the underside of the plywood. Once fastened, we gave the pieces 3 three coats of lacquer to help protect the product.


Construction Manager, Justin Fantasia, installing 3/4" red oak plywood for window trim
Finished window sill

After the trim in the house was installed, we moved on to the installation of appliances that had been delivered a few days earlier. Included in that installation were all the usual suspects: a refrigerator, washer, dryer, dishwasher, and microwave that doubles as a  range hood. Installation of the appliances was rather straightforward and took approximately half a day.

Washer, removed from its package and ready for installation

Kitchen view before appliance installation
Kitchen view after installation of microwave and stove

Cross section of cut-out wall for installation of vent hood.